Artfire

Artfire
Showing posts with label Mix Media. Show all posts

Sunday, 27 January 2019

Baby Album

Good morning 

A newborn is always a cause for celebration and gifting.  So when I came to know that one of my close friends was due for a little one, it was a cause of excitement.  And thus began the hunt started for the perfect gift for the parents and the little one.  

But I wanted to give something which will hold value after many years also.  So I decided to make a baby album to store all the precious memories. This album is made in generic colours as we did not know where it would be a girl or boy. 

Using a generic baby paper stack and supplies and adding some generic paper from my stash, I have created this 14 paged, 8" * 8" with a 4" spine baby album from scratch.  A point to be noted here is you don't need paper from the same stack.  I have added some paper from another 2-3 stacks that I had on hand. ( I did this as I wanted a lot of paper for the picture mats and inserts) 

I will not go into the details for making each page as there are host of tutorials and info on the internet.  But as the receiving family had no idea about scrapbooks I did try to keep it simple for them to understand.  At the same time each page is different in terms of layout. 

Another thing that I kept in mind is additional pockets and picture mats to store all the precious memories.  

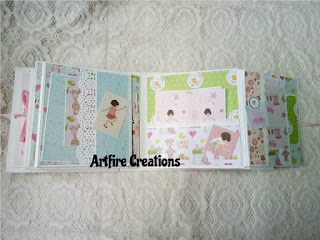
As I already mentioned this is a 14 page album with many fold outs and pockets.  It has a capacity of storing many photographs.  Also I did create a ton of picture mats / inserts from all the left over paper.  

The flowers on the cover as well as inside are all handmade using speciality paper.  Also I have used a lot of embellishments from my stash.  

Here are few of the pics of the various pages and a overview video of the album.  


Hope you have enjoyed this inspiration and album.  Happy crafting 


Mix media spectacle box - Blue and green

Good morning,

On the completion of the earlier spectacle case I had a lot of requests from my aunts and friends to do theirs.  So I agreed and decided to do another one.  

But this time I decided to be a bit bold.  Taking the serene colours of blue and green I decided to alter this case using those colours but blinged up with a dash of gold. 

So let's get into the project. Here are the basic steps for altering this old case into something new. 

1. I first sanded the case gently to remove all the peeling off leather.  Then I went ahead and applied dry wall tape in most of the areas. 

2. Once this was complete I covered the entire case in white gesso.  I did 2-3 coats of it till I was happy with the result. I did a bit of stencilling also in places.  

3. Selecting the embellishments that I wanted to put I created an arrangement that I liked and glued it down properly.  It doesn't matter at this stage if the elements are all of different colours.  They will be covered.  I ensured the there are not too many layers as this was a object that was going to get used extensively and even be carried around in the bag.  


4. Once everything was dried, I covered everything in white gesso. This ensures that my base is ready for all the colours and inks and paint.  

5. Using home made sprays and Lindy's spray I covered some areas in green and some in shades of blue.  I wanted the mid portion and the main focal elements to be in blue and the rest to be in green. In between layers I did dry brushing with white gesso to lighten a area and added another shade of the colour.  

6. Finally when everything was dry and I was happy with the colours, I lightly touched all the areas with gold.  I did this with a finger as I wanted the golden just on some of the highlighted areas. 

7. I as a security measure sealed up everything with a bosny spray.  This was done as the case was going to to extensively used.  

Thus this old battered spectacle case finally had a new lease of life. 

Here are some of the pictures of the final project 


Hope you enjoyed this project and inspiration.  Do leave some love here. 


Saturday, 26 January 2019

Mix media tags - Autumn fall

Good morning, 

"In crafting there are no mistakes,  just unique creations"

This is the mantra that I usually live with.  I don't have any pre-notions of how my projects will turn out to be.  

So when I started on these tags I had no idea on how they would look.  All I knew is I wanted to use some warm colours to contrast the earlier tags that I had made.  

These tags have been made in the old clothes tags we receive when we buy new clothes.  


So here is how these tags were created.  (I have made a set of three tags using the same embellishments with changes in the layout) 

To start with I did some basic stencilling and covered the entire tag with gesso.  Once the base was ready I added some colour and did some stamping with black.  

Then I went ahead and added some lace,  thread and a few mdf embellishments and some home made clay embellishments.  

Once everything was properly stuck I added some readymade flowers and some handmade flowers.  (the small flowers on the side are handmade flowers).  Also I added some clay leaves,  filler pollens, and fused pearls to complete the composition. 

Once everything was in its place and dry I started colouring the composition.  I used a brush to apply the colours as I wanted some control on where the colours were going.  I have used some sprays,  acrylic colours and shimmer paints to achieve the effect.  

Once the entire tag was ready I added some gold dots to complete the look. 

Here are some pics of the completed project.  Hope you like these


Wishing you a wonderful day.  Please do leave some comments and love below


Altered Pen stand

Good morning everyone,

Recycling and altered art is becoming a buzz word today.  This is mainly because we have started to realize that we cannot go on depleting our natural resources forever.  

There are many things in our surroundings that can be modified or altered to not only look more beautiful but also to get another lease of life.  

So this time I decided to make something functional for my craft table.  Thus came out the tin can that had been saved from being thrown for storing my paint brushes.  


For those who know me, I usually prefer working with earth tones or warm colors. And pink is a colour that usually does not figure anywhere. A friend of mine had recently challenged me to experiment and work with pink. Thus I decided to create this pen stand in shades of pink, lavender and purple.  The palette of colours I don't work with.  Also this would be a constant reminder to work in colours and styles that I usually don't follow.  

Before we start on the project we need to ensure that all the sharp edges of the can is completely smootten out.  Now we are ready to start creating. 

So here is how I went about recycling this can

First I adhered a piece of ordinary cloth bag to the entire outer surface.  I did this because most of the cloth bags have a beautiful texture.  To that I added some dry wall tape and a lace with pearls on that.  

After sticking it I covered the entire surface with gesso. I also added a bit of coarse modelling paste (modelling paste mixed with fine sand) in some areas to add some interest.

Then I went about creating a composition of flowers.  In this composition I have used a fair amount of homemade clay embellishments(florish and leaves). I have used several big mulberry flowers from my DT kit.  Also I have created a lot of small handmade flowers to add to composition.  In the end I have added glass beads with modelling paste.  

Once everything was stuck properly I have given everything a few coats of gesso.  The flowers I had used were of different colors so it was important to cover everything in white.  

Once everything was properly covered I started with adding color to this. For this I have used sprays,  acrylic paint  and some home made sprays too. I have added many layers of colours. For dry brushing between coats of colour I have used white gesso mixed with pearl white colour.  This added a very beautiful shine to the project. I continued adding color till I achieved a deep shades of pink and purple. 

Once the entire project was completed, I dry brushed it again with pearl white colour. I also painted the insides and the bottom of the can with chalk colours in the same palette. 

And finally I had a altered pen / brush holder for my desk ready. Here are few pics of the completed project....  


Hope you liked these and so leave your comments on the same.  


Mix Media Tags - Steampunk

Good morning everyone, 

Lately I have become a hoarder of just about every piece of junk possible. Everything that I see can be altered or used in a different manner.  And my favorite things to collect are tags.  Everytime we buy clothes we get a host of tags and some of them are sturdy and beautifully made.  

These can be added to mix media panels to create background.  Better still they can used to create gift tags or even experiment on.  

So here is what I have created 


So let's get into the procedure for creating these

I have take two identical black tags.  These are sturdy and will be able to take weight of all the embellishments that I plan to put. Both the tags are created using the same embellishments.  Placement has been done differently to create a unique look to both the tags


I started by adding texture to the background.  I have added two levels of texture to create more depth in the texture.  After my texture was dry I painted it completely black with gesso.  

Then,  I have added bits of corrugated cardboard in places to add another dimension to the project.  

Once my background was ready, then it was time to add all my embellishments to the base.. I have used mdf gears,  metal chain,  some metal charms,  buttons,  screws and even some nails.  Once it was all dry and stuck properly, I have painted it again with black gesso... 

At this point I was not completely happy with it...  Living in coastal area and in defense we deal with corrosion and rust on a daily basis. And this was not looking corroded or rusted even one bit. 

This I took my modelling paste and added some sand to it to make it coarse and applied it in places...  And it suddenly all came together.  

Once it was all dry I again covered it in with black gesso.  

Now came the part of colouring it to give a rusted effect.  Not having the Prima rust set I decided to try a hack.  I took acrylic colours in burnt umber,  burnt sienna and very little amount of deep yellow. To the burnt umber and burnt sienna I added a bit of cinnamon powder to make it coarse.  

I could have used sand but that would have been too coarse. And then I started painting my surface...  And I kept adding layers till I was satisfied with the outcome.  

Once everything was dry I added a bit of antique gold mixed with brown to highlight certain areas to give a effect of metal. 

And these turned out beautiful. Here are some close ups of both the tags.  


Hope you have a wonderful day 


Mix Media Tags - Blue

Good morning everyone 

"Like life,  at times the journey is more important than the destination"

I have lately become fascinated with the art of mix media.  The beauty of this craft form is the fact is there are no set rules.  And that is what makes it interesting.  

Having become a collector lately I have been collecting a lot of things that would usually be thrown away by us...  Bits of paper,  cloth tags, buttons,  tree bark,  bottle caps,  cheese cloth and god only knows what all... 

So when I was told to make a mix media project I had a wide variety of stuff to add and experiment with.   Considering that I was just planning  to experiment I decided to do some mix media tags.  

As we are in January the temperature has dropped and its winter all over in India. Though in Kochi there is never a winter but it is certainly cooler than what it is, throughout the year. I wanted to create something which would give an effect of Winter ... Cold.. and a feel of cold is depicted by the colour blue. Add to that bits of silver to add on to the effect of winter....  And here is what I have created.  


These have been created in old clothes tag which we usually get when we buy clothes.  Most of the time we just cut these and throw it away. But I decided to use these as the base.  

I have painted these white with gesso and have added texture using modelling paste.  Once dry using folkart paint I have created a light blue wash. To this I have added a bit of color using memento inks.  

Once my background was ready, it was time to put to put the composition.  For this I have used some ready made flowers as well as have created some handmade flowers.  

I have created layers using some gauze,  and mdf gears. To that I have added some fused pearls on a string,  some pollen fillers,  the flowers and a few other pieces of mdf and some buttons and ends.  

Once my composition was ready I have applied white gesso on all the coloured areas.  Then I have added the shades of blue using acrylic paints,  some moments inks and cosmic water color paints.  The cosmic paints added a bit of a shine to the entire project and thus added to the effect of water.  I kept working on the colouring till I achieved the effect I was looking for.  

Right in the end I added a few dew drops to bring the project together.

I have created two different tags using almost the same techniques and embellishments.  Thus they are different but at the same time similar.  

Hope you like this inspiration. 

Here are some close ups of the same.  


Wishing you a wonderful day ahead 


Saturday, 30 September 2017

Mix Media Vase

Good evening,

Its been a long time since I have posted something on my blog. Actually its been more than a year since I have been posted.

I am really sorry to all for that.

Though I have not been posting I have been active in terms of learning new crafts and making projects....And yes I will take some time out and share all the projects that I have created in the past year. Also I have been practicing my already learned skills in creating new looks and stretching it to create new ideas.

One of the art forms that has held my interest in the last few years has been  mixed media. I did attend a workshop on the basics while I was on a holiday in Pune a few months back and it was super fun. Also the one thing that I truly love about this form is that there are no specific rules for creating a look.

At the same time even ordinary things lying around the house can be used to beautiful works of art. So you could experiment with expensive craft supplies, or you could take common items lying around the house and create something beautiful.

Here is the project that I created when I attended the workshop in Pune. This is made using all the beautiful and expensive products used by mix media artists.


But I wanted to create something different and experiment with items that were in my stash and things found at home. Thus a small ordinary terracotta vase was given a new look....

I have used things I found at home like gauze, rhinestones, sand, handmade flowers coupled along with some left over embellishments from previous projects and MDF embellishments to create this mix media projects.

Here is the beautiful mix media vase.


What do you say? I do hope you do like it....

And I will surely be posting more projects in the future.

Happy Crafting....